[Style Guide] How to Set Up Prettier for JavaScript in IntelliJ and WebStorm
Last Modified : 27 Feb, 2023 / Created : 27 Feb, 2023When developing web applications using JavaScript, Prettier is commonly used for style guide purposes. If you're using an IDE, you can configure Prettier to automatically apply style formatting or update the code when saving. In this article, we'll briefly explore Prettier and how to set it up in your IDE.

Prettier is one of the most well-known coding style guide tools. It validates whether code is written according to the specified style guide, notifies you of the results, and can automatically fix errors, making it a very convenient tool. If you have bad coding habits due to incorrect coding styles, you can use Prettier to apply the correct coding guide and change those bad habits.
@ Prettier is especially necessary for collaboration
The biggest reason to install and apply such a style guide is that it is particularly effective in projects with multiple participants. Since each developer has their own coding style, having multiple coding styles makes web applications even more complex and difficult to understand. As a result, maintenance and refactoring become more challenging. To address this problem, many people use Prettier to force a specific coding style. Linting, which is commonly used together, serves the purpose of identifying language syntax and incorrect errors and has differences from Prettier.
Now that we have a basic understanding of Prettier, let's learn how to apply and use it in an Integrated Development Environment (IDE). Although this article focuses on IntelliJ and WebStorm, which are the most commonly used IDEs for JavaScript, the process is similar for other IDEs like Visual Studio Code.
Here's a quick overview of the steps:
Let's take a closer look at each of these steps.
1. Install prettier
Install Prettier globally from npm. Use the following command to install Prettier globally for both global usage and Command Line Interface (CLI).
2. Open the settings window in IntelliJ
Open IntelliJ or WebStorm and navigate to the settings window (Settings). You can do this using the shortcut key Ctrl + Alt + S.
3. Install Prettier in the Plugins tab
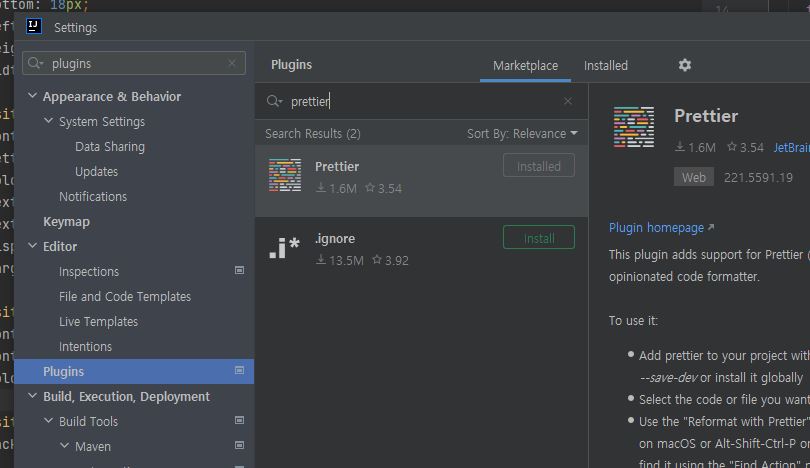
Now you need to install and register Prettier as an IDE plugin. Type "plugins" in the upper left corner, find Prettier, and click the install button.
 Installing Prettier in IntelliJ
Note that you may need to reinstall Prettier if the IDE version is incompatible or if the Prettier version is outdated.
4. Go to the Prettier menu and set it up
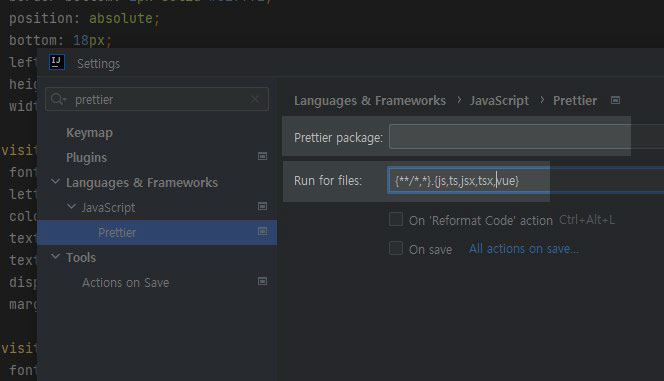
Now that Prettier is installed, you need to configure it to use it. You can find the installed Prettier in the settings menu below.
Issue resolution: If you cannot see Prettier, it may not be installed, so check again to see if it is installed.

When you select Prettier, you can configure it on the right side of the screen. First, you can select prettier from the installed packages in the Prettier package. Find and select the installed prettier.
Then, Run for files below determines which files prettier will be applied to. If you need to apply it to a vue file, add vue and save. Be careful not to save it if you haven't set it, as it won't run even if you save the file.
Next, check one of the selection checkboxes, On Save. Now, when you save a file, Prettier automatically runs and helps you update and change the coding style of the configured files.
So far, we've briefly learned how to install, configure, and use Prettier in an IDE. Once you set it up, it will automatically work from then on, so you can feel how convenient it is to use IDE after trying it out once.

# Why use Prettier
Prettier is one of the most well-known coding style guide tools. It validates whether code is written according to the specified style guide, notifies you of the results, and can automatically fix errors, making it a very convenient tool. If you have bad coding habits due to incorrect coding styles, you can use Prettier to apply the correct coding guide and change those bad habits.
@ Prettier is especially necessary for collaboration
The biggest reason to install and apply such a style guide is that it is particularly effective in projects with multiple participants. Since each developer has their own coding style, having multiple coding styles makes web applications even more complex and difficult to understand. As a result, maintenance and refactoring become more challenging. To address this problem, many people use Prettier to force a specific coding style. Linting, which is commonly used together, serves the purpose of identifying language syntax and incorrect errors and has differences from Prettier.
! How to set up and use Prettier in an IDE
Now that we have a basic understanding of Prettier, let's learn how to apply and use it in an Integrated Development Environment (IDE). Although this article focuses on IntelliJ and WebStorm, which are the most commonly used IDEs for JavaScript, the process is similar for other IDEs like Visual Studio Code.
Here's a quick overview of the steps:
- Install Prettier from npm
- Open the settings window in IntelliJ
- Install Prettier in the Plugins tab
- Set up Prettier in the Prettier menu
Let's take a closer look at each of these steps.
1. Install prettier
Install Prettier globally from npm. Use the following command to install Prettier globally for both global usage and Command Line Interface (CLI).
npm i --global prettier
2. Open the settings window in IntelliJ
Open IntelliJ or WebStorm and navigate to the settings window (Settings). You can do this using the shortcut key Ctrl + Alt + S.
3. Install Prettier in the Plugins tab
Now you need to install and register Prettier as an IDE plugin. Type "plugins" in the upper left corner, find Prettier, and click the install button.
 Installing Prettier in IntelliJ
Note that you may need to reinstall Prettier if the IDE version is incompatible or if the Prettier version is outdated.
4. Go to the Prettier menu and set it up
Now that Prettier is installed, you need to configure it to use it. You can find the installed Prettier in the settings menu below.
Languages & Frameworks > Javascript > Select Prettier
Issue resolution: If you cannot see Prettier, it may not be installed, so check again to see if it is installed.

When you select Prettier, you can configure it on the right side of the screen. First, you can select prettier from the installed packages in the Prettier package. Find and select the installed prettier.
Then, Run for files below determines which files prettier will be applied to. If you need to apply it to a vue file, add vue and save. Be careful not to save it if you haven't set it, as it won't run even if you save the file.
Next, check one of the selection checkboxes, On Save. Now, when you save a file, Prettier automatically runs and helps you update and change the coding style of the configured files.
! Conclusion
So far, we've briefly learned how to install, configure, and use Prettier in an IDE. Once you set it up, it will automatically work from then on, so you can feel how convenient it is to use IDE after trying it out once.
Perhaps you're looking for the following text as well?
